FAQ - Vocareum
If your issue cannot be resolved by any of the FAQ, please email vlisupport@suss.edu.sg for assistance.
Table of contents
- Browser requirements and configurations
- Blank screen on Safari browser while accessing Vocareum Labs
- Desktop Screensaver Password
- Black Box appearing on Virtual Desktop
- Virtual desktop connection lost
- Disconnected from Vocareum Labs / Cannot access Vocareum Labs
- Failed to launch Lab
- Unable to login to MongoDB Compass due to incorrect keyring
- Copy/Paste text from Local Desktop to Virtual Desktop
- Copy/Paste text from Virtual Desktop to Local Desktop
- Copy/Paste text from Local Desktop to Cloud IDE/JupyerLab
- Copy/Paste text from Cloud IDE/JupyerLab to Local Desktop
- How do I download files from Vocareum to my Local Desktop?
- How do I upload my work to Vocareum?
Browser requirements and configurations
Google Chrome
- Update the web browser to the latest version.
- System Requirements (Please refer here for the latest information):
a. Windows
i. Windows 7, Windows 8, Windows 8.1, Windows 10 or later
ii. An Intel Pentium 4 processor or later that’s SSE3 capable
b. MAC OS
i. macOS High Sierra 10.13 later
c. Linux OS
i. 64-bit Ubuntu 18.04+, Debian 10+, openSUSE 15.2+, or Fedora Linux 32+
ii. An Intel Pentium 4 processor or later that’s SSE3 capable -
Configure browser to allow third-party cookies from Vocareum. The screenshots provided at the time of writing is based on version
115.0.5790.110.
a. Open Chrome browser.
b. On the URL bar, enterchrome://settings/cookies
c. Scroll down the page until you see this section – Sites that can always use cookies and click on the Add button.

d. In the Add a site box, enter
[*.]labs.vocareum.cominto the Site prompt and check Including third-party cookies on this site.
e. Click Add button to add and the prompt box will close.
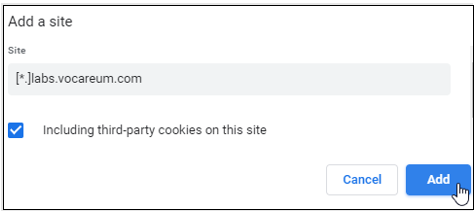
f. You will notice that your entry is now displayed at this section.

g. Restart your Chrome browser and you should be able to access Vocareum Labs now.
Blank screen on Safari browser while accessing Vocareum Labs
Students who are using Safari browser on their MAC may encounter this issue where a blank screen will appear after clicking on Vocareum Labs on Canvas (see image below).
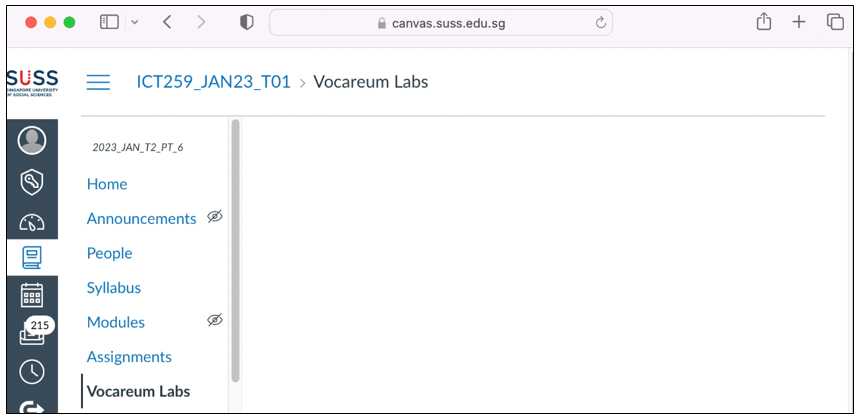
To solve the issue:
-
Click on Safari, then select Preferences.

- From the Preferences window, click on Privacy.
-
Under Website tracking setting, uncheck the Prevent cross-site tracking option.
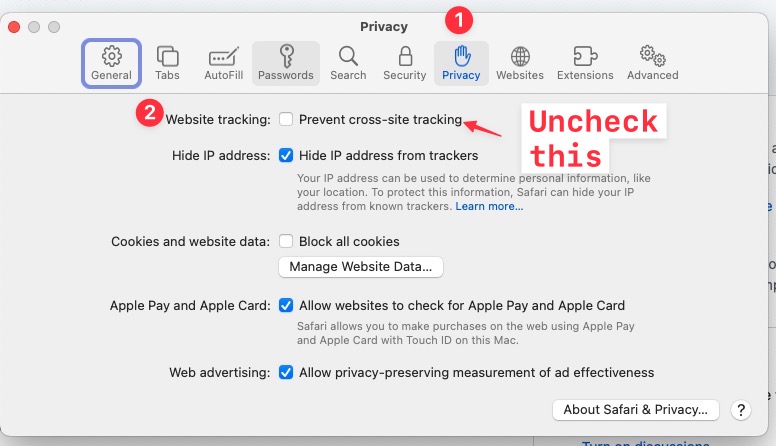
- Close the prompt box.
- Refresh the Safari browser page.
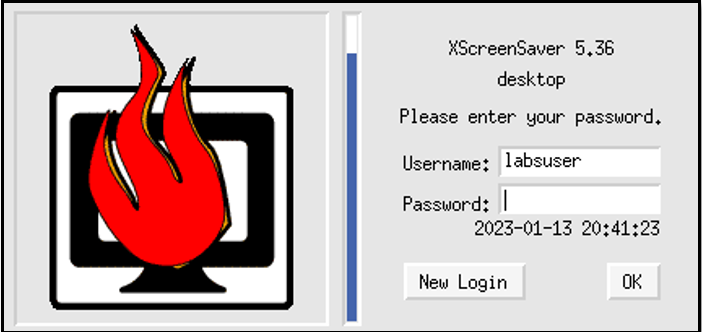
Desktop Screensaver Password
For users who come across the virtual desktop screensaver and need the password to unlock it, the password is labsuser.
Black Box appearing on Virtual Desktop
If you have selected One empty panel on the Panel Prompt as shown below, you will get a black box on the desktop.
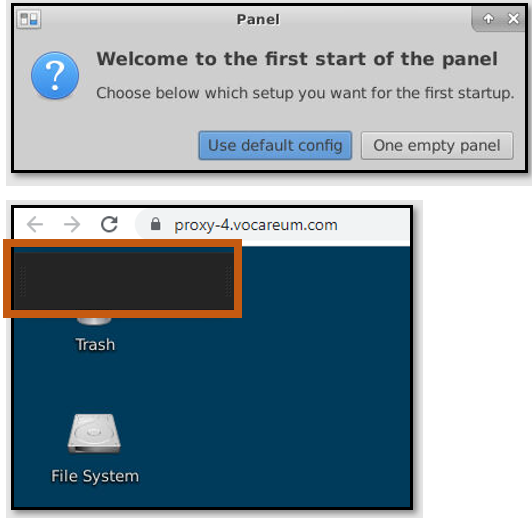
To resolve this issue:
- Right-click on an empty space on the desktop and click Open Terminal Here from the menu.
- Once the terminal appears, enter the following command:
rm -rf ~/.config/xfce4/ - Navigate back to Work Workspace and click End Lab
- Click Start Lab to start the lab again.
- Once the lab starts, remember to choose Use default config
Virtual desktop connection lost
Possible scenarios:
-
Your virtual desktop connection suddenly gets lost, and you are unable to re-connect back to your virtual desktop. A sample of the error is shown below.
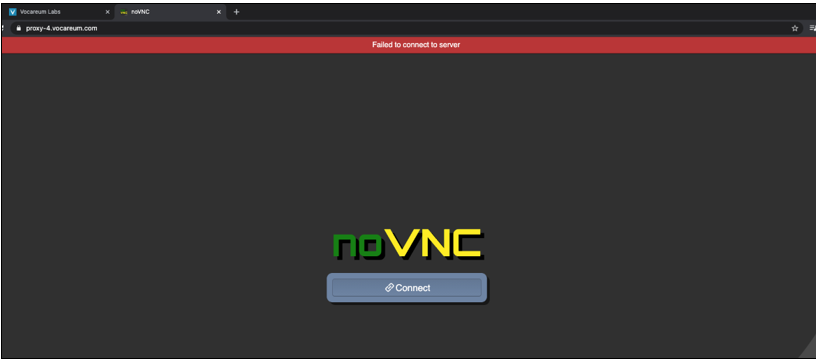
-
The noVNC loading is stuck at the connecting loop indefinitely.
To resolve these issues:
a. Close the noVNC browser tab.
b. Navigate back to the Work Workspace and end the current session by clicking End Lab.
c. Click on Start Lab to obtain a new session.

Disconnected from Vocareum Labs / Cannot access Vocareum Labs
For Vocareum labs, there is a time limit of 5 hours for each session. The session will be automatically disconnected once the 5 hours is up. You can check on the time left for your session from your work space, beside the “Start Lab” button (see image below).

You can re-access your lab by closing the lab and starting a new lab session using the “End Lab” and “Start Lab” buttons.
If the above method does not work, you can click on “Vocareum Lab” in Canvas to reload the Vocareum lab to start a new lab session.

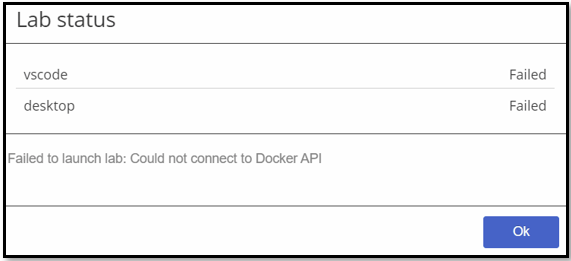
Failed to launch Lab
If one of the following error message appears after clicking My Work, please close the message and click Start Lab again. The lab session will be able to start as soon as it has completed loading.


Unable to login to MongoDB Compass due to incorrect keyring
To reset your password:
- Open a terminal in the virtual desktop.
- Run the command:
rm -rfv ~/.local/share/keyrings/Default_keyring.keyring - Close the MongoDB compass application.
- Re-launch the MongoDB compass application. Accept the default and click Connect
-
The prompt to set the password for a new keyring will appear.
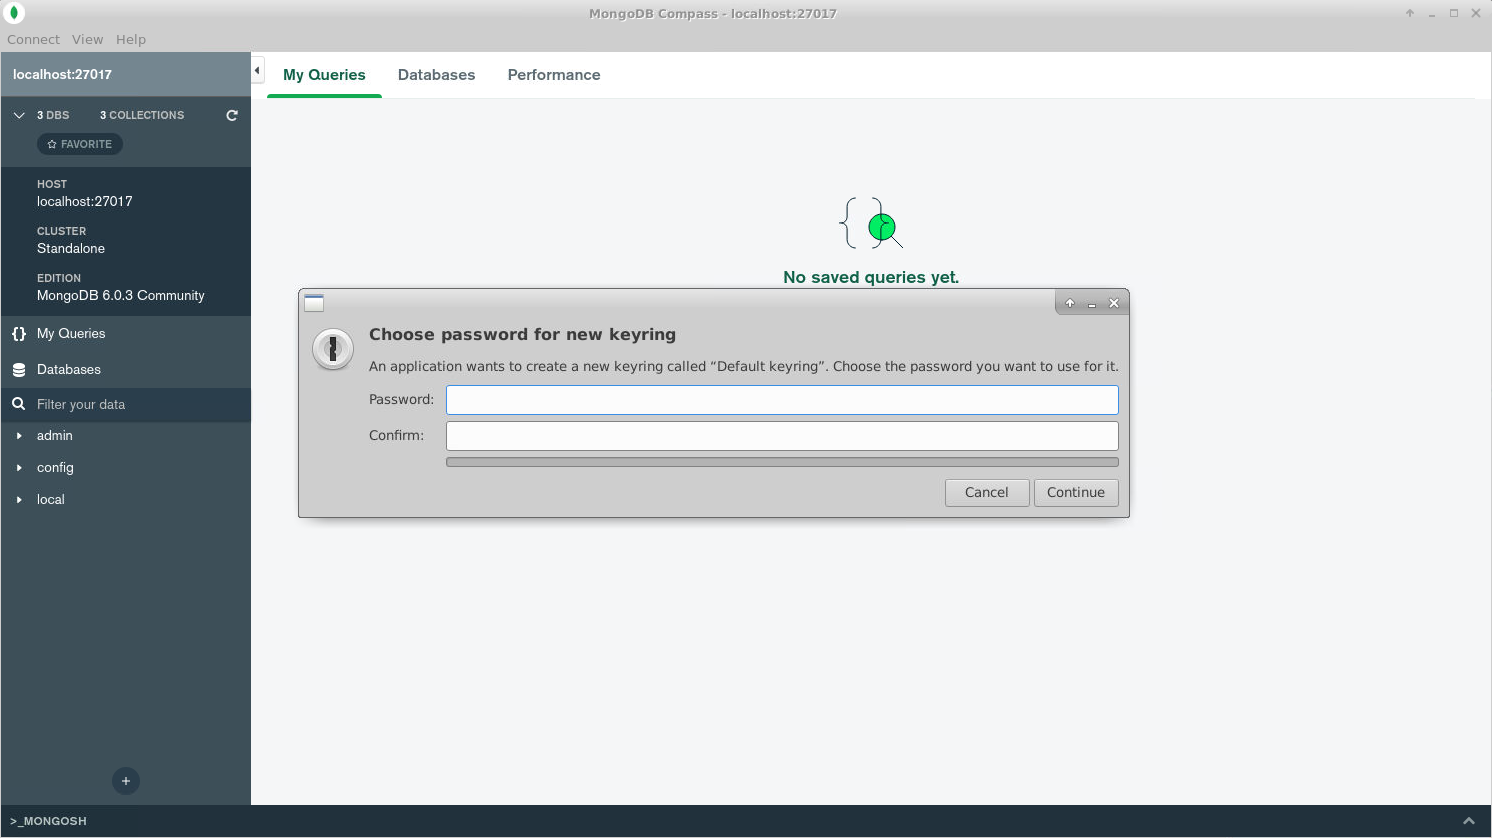
- Enter a new password for the keyring.
Copy/Paste text from Local Desktop to Virtual Desktop
- Use Ctrl + C keyboard shortcut to copy the text from your local desktop.
-
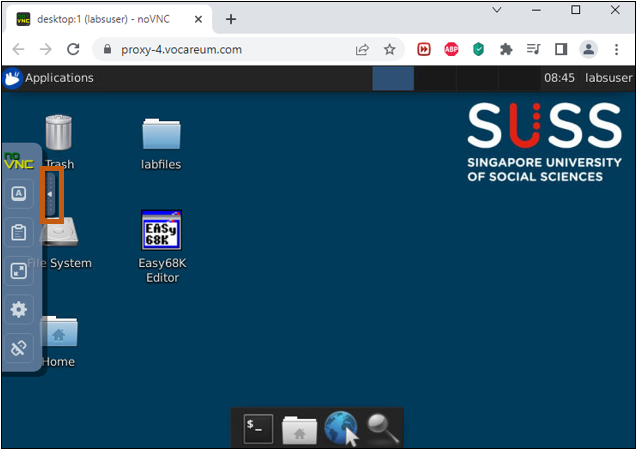
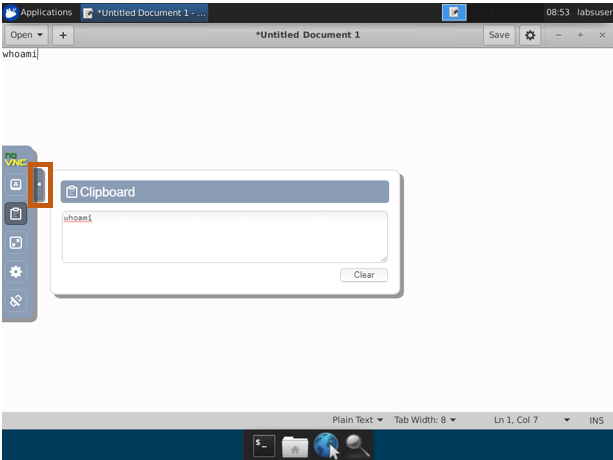
Navigate to your virtual desktop and click on the arrow to open the noVNC control panel.
-
Click on the Clipboard button on the noVNC control panel to open the Clipboard.
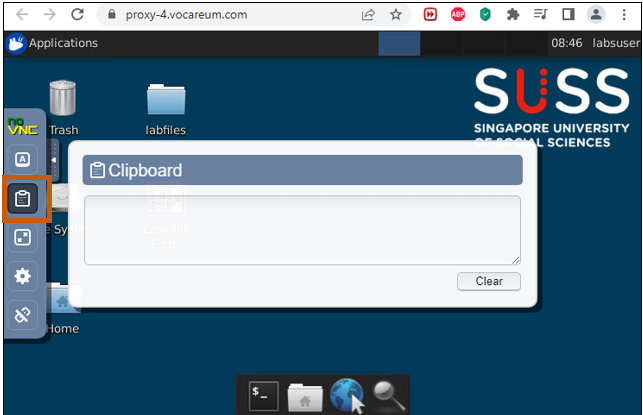
- Use Ctrl + V keyboard shortcut to paste the text into the Clipboard.
-
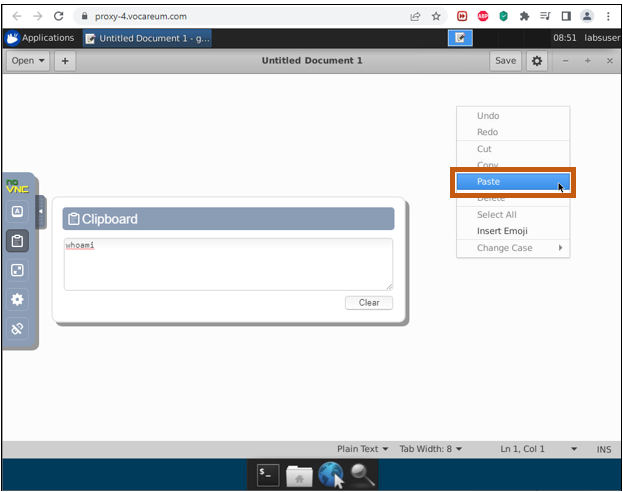
In your virtual desktop, right-click on your mouse and click Paste to paste the contents on the application.
-
Click the arrow on the noVNC control panel to hide it.
Copy/Paste text from Virtual Desktop to Local Desktop
-
Highlight the text you want to copy to the local desktop.
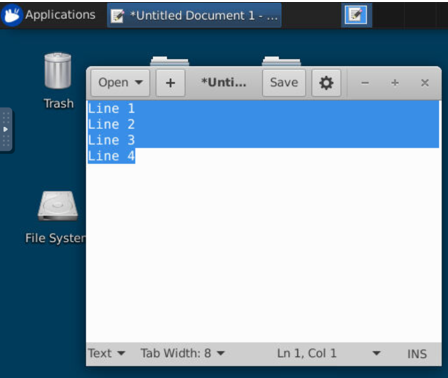
- Click on the arrow on the left to open the noVNC control panel.
-
Click on the Clipboard button on the noVNC control panel to display the Clipboard.
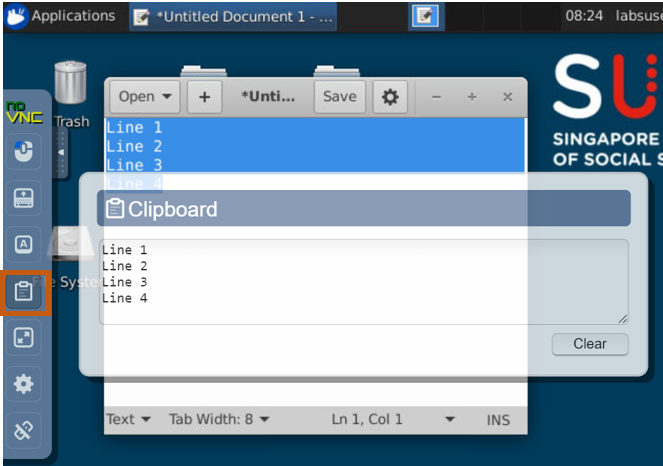
- Use the Ctrl + C keyboard shortcut to copy the text in the Clipboard.
- Use the Ctrl + V keyboard shortcut to paste the text in your local desktop.
Copy/Paste text from Local Desktop to Cloud IDE/JupyerLab
- Use the Ctrl+C keyboard shortcut to copy the text from your Local Desktop.
- Use the Ctrl+V keyboard shortcut to paste the text to the Cloud IDE/JupyterLab.
Copy/Paste text from Cloud IDE/JupyerLab to Local Desktop
- Use the Ctrl+C keyboard shortcut to copy the text from the Cloud IDE/JupyterLab.
- Use the Ctrl+V keyboard shortcut to paste the text to your Local Desktop.
How do I download files from Vocareum to my Local Desktop?
Downloading from VSCode IDE
- Select the file(s) that you wish to download.
-
To select multiple files, hold down on the
Controlbutton (for Windows) on the keyboard and select the files one by one. The selected files will be highlighted in blue.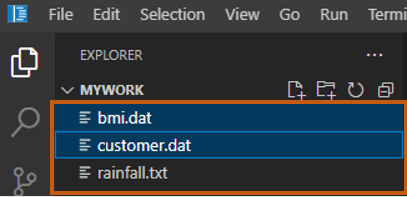
-
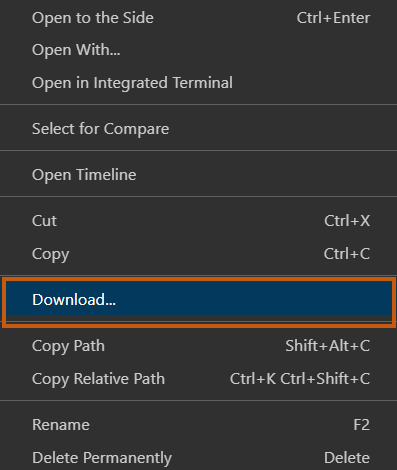
Right click on the selected file(s) and click on Download.
-
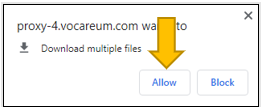
If there is a prompt appearing on your screen to ask for your permission, click Allow.
-
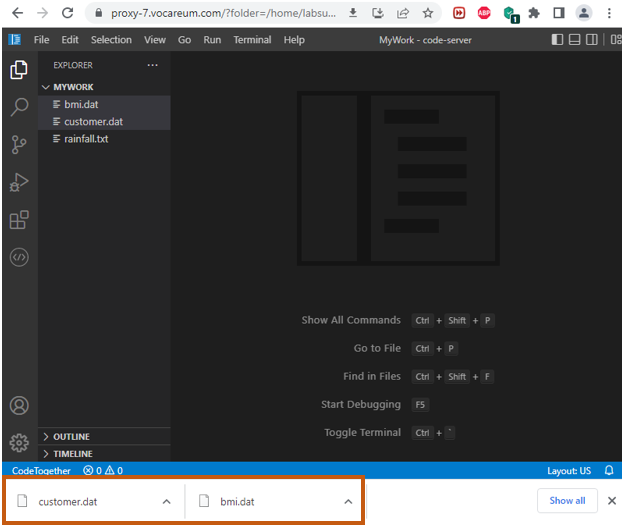
Verify that the file(s) have been downloaded to your computer.
Downloading from JupyterLab IDE
- Select the file(s) that you wish to download.
-
To select multiple files, hold down on the
Controlbutton (for Windows) on the keyboard and select the files one by one. The selected files will be highlighted in blue.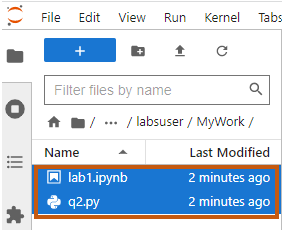
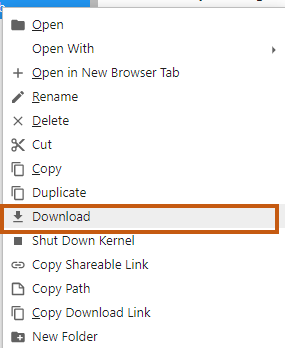
- Right click on the selected file(s) you wish to download.
-
Select “Download”.
Downloading from Virtual Desktop
-
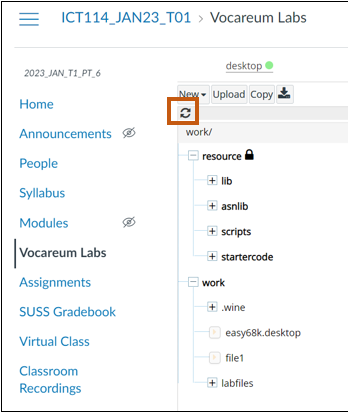
Navigate to Work WorkSpace and click the Reload icon once to reload the file tree. This step will reload the contents of the work folder.
-
Click on the file/folder that you wish to download.
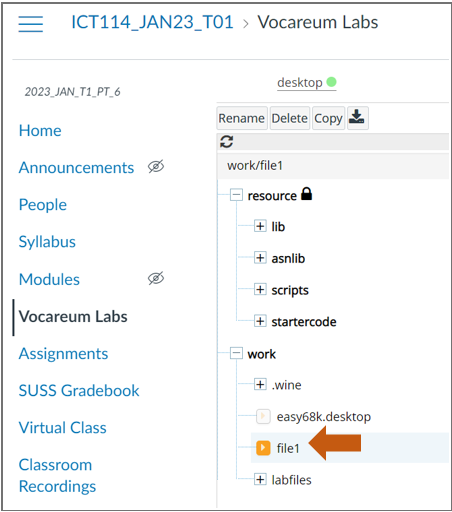
{: .important } If you have multiple files/folders to download, you must do it one by one. The recommended way would be to zip up the files/folders into 1 zip file and you download the single zip file.
-
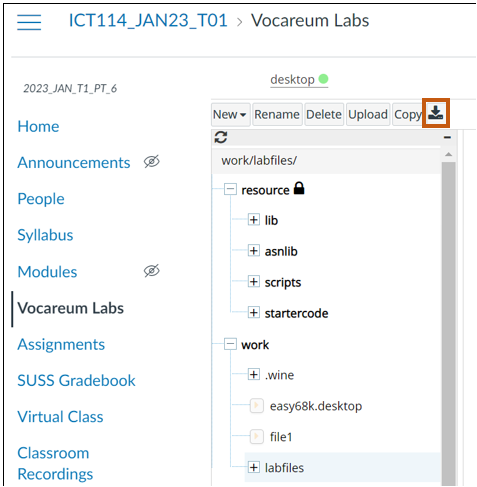
Click on the Download icon button.
-
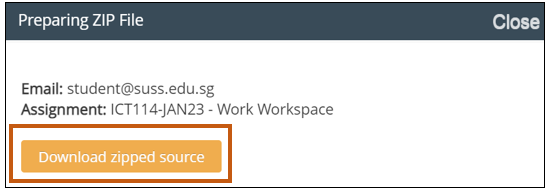
The system will automatically compress the selected file/folder into a zip file. Click Download zipped source to download the file.
How do I upload my work to Vocareum?
Uploading to VSCode IDE
Method 1
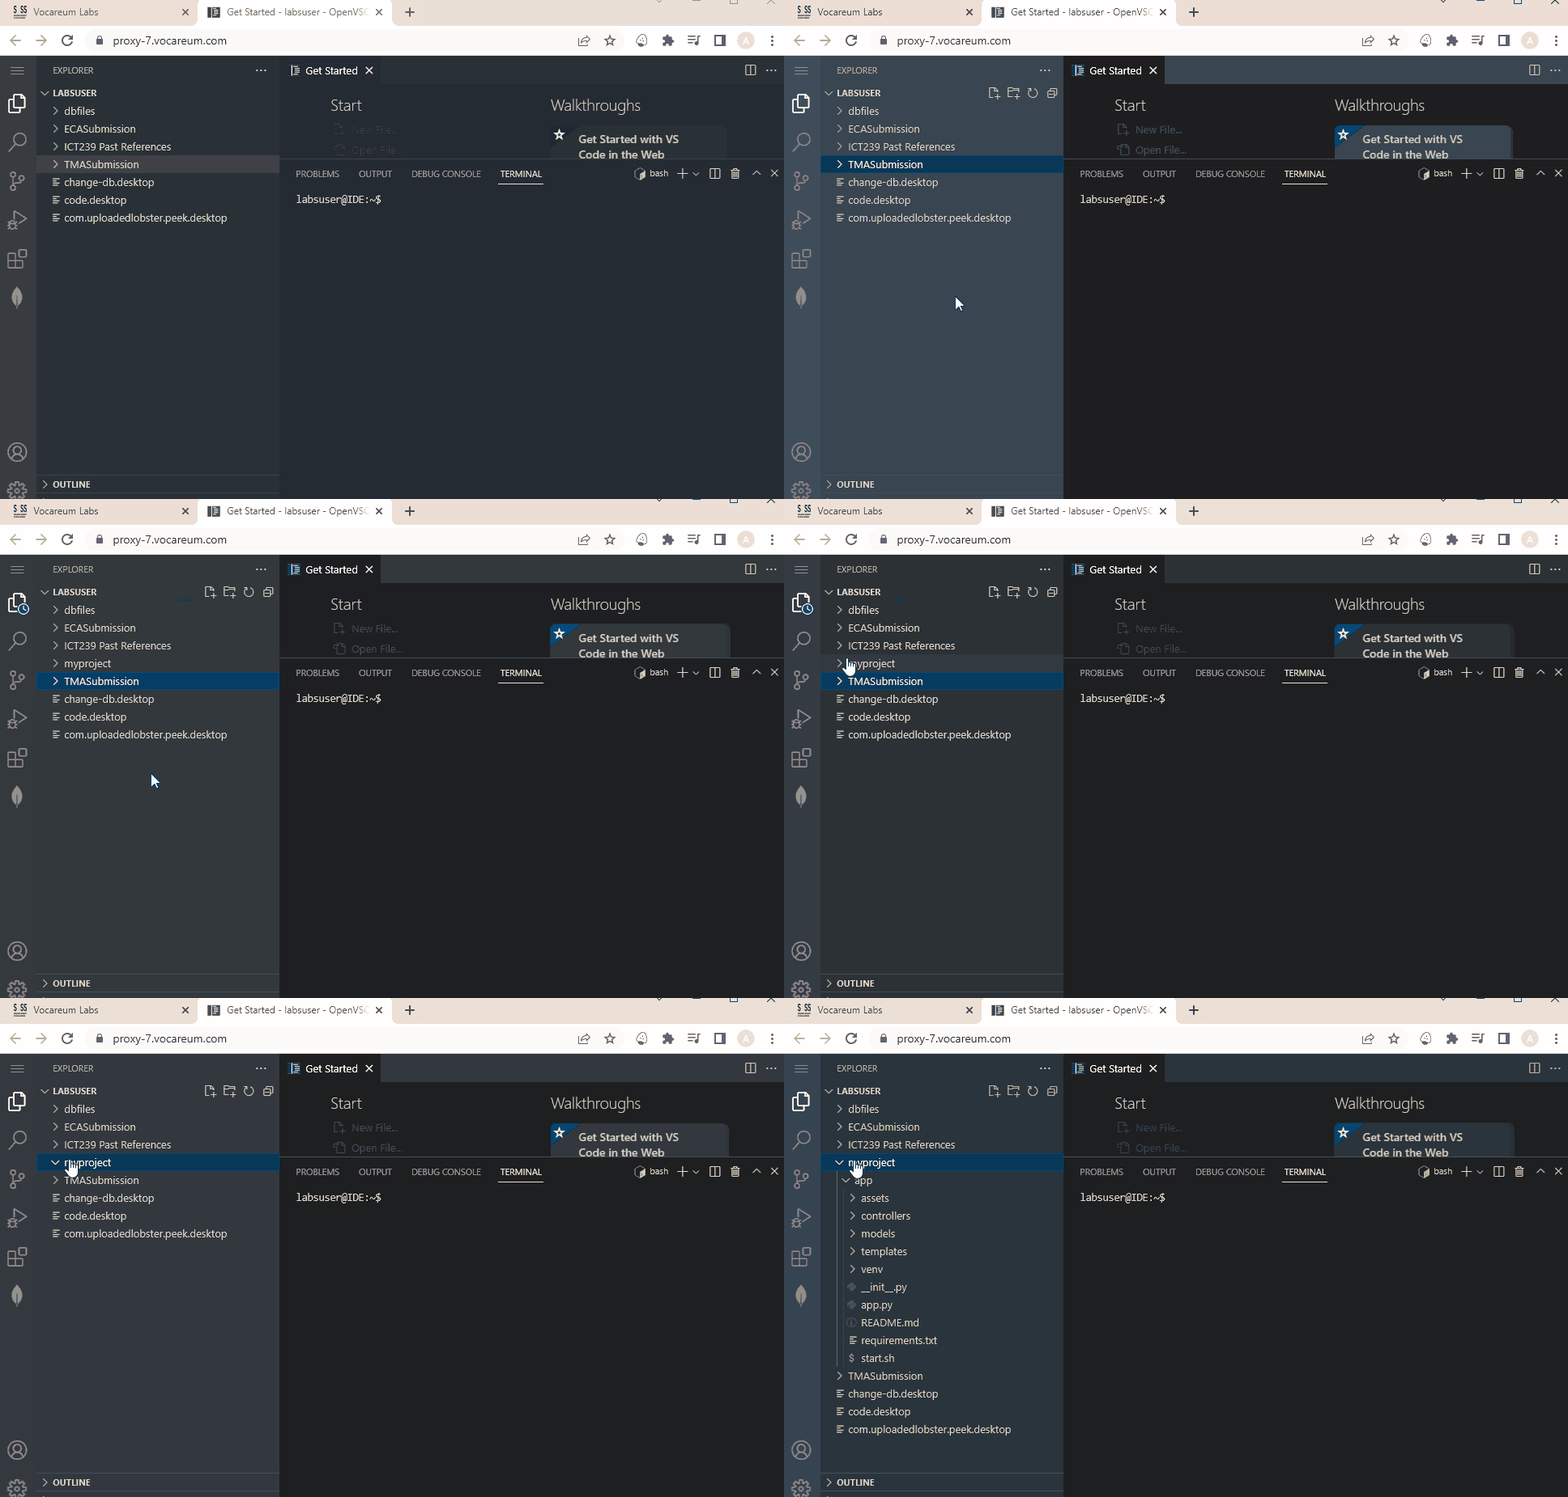
Simply drag and drop your directory into the explorer of IDE on Vocareum. See below.
Method 2
- Navigate to the directory where you wish to upload your file(s).
-
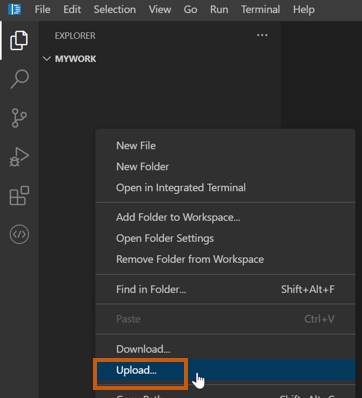
Right-click on an empty area on the file explorer, click Upload and select the file(s) that you wish to upload.
-
To upload multiple files, hold down on the
Controlbutton (for Windows) on the keyboard and select the files one by one. The selected files will be highlighted in blue. Click Open to upload.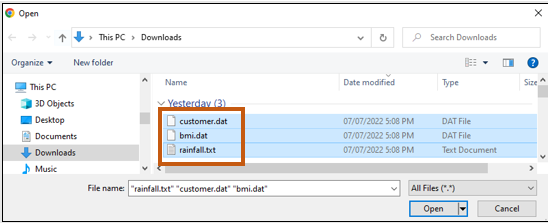
-
Once upload is completed, you can find the file(s) listed under the directory in your IDE.
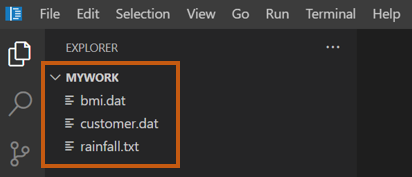
Uploading to JupyterLab IDE
- Navigate into the directory you wish to upload to.
- Click on the Upload icon button and select the file to upload.
-
To upload multiple files, hold down on the
Controlbutton (for Windows) on the keyboard and select the files one by one. The selected files will be highlighted in blue. Click Open to upload.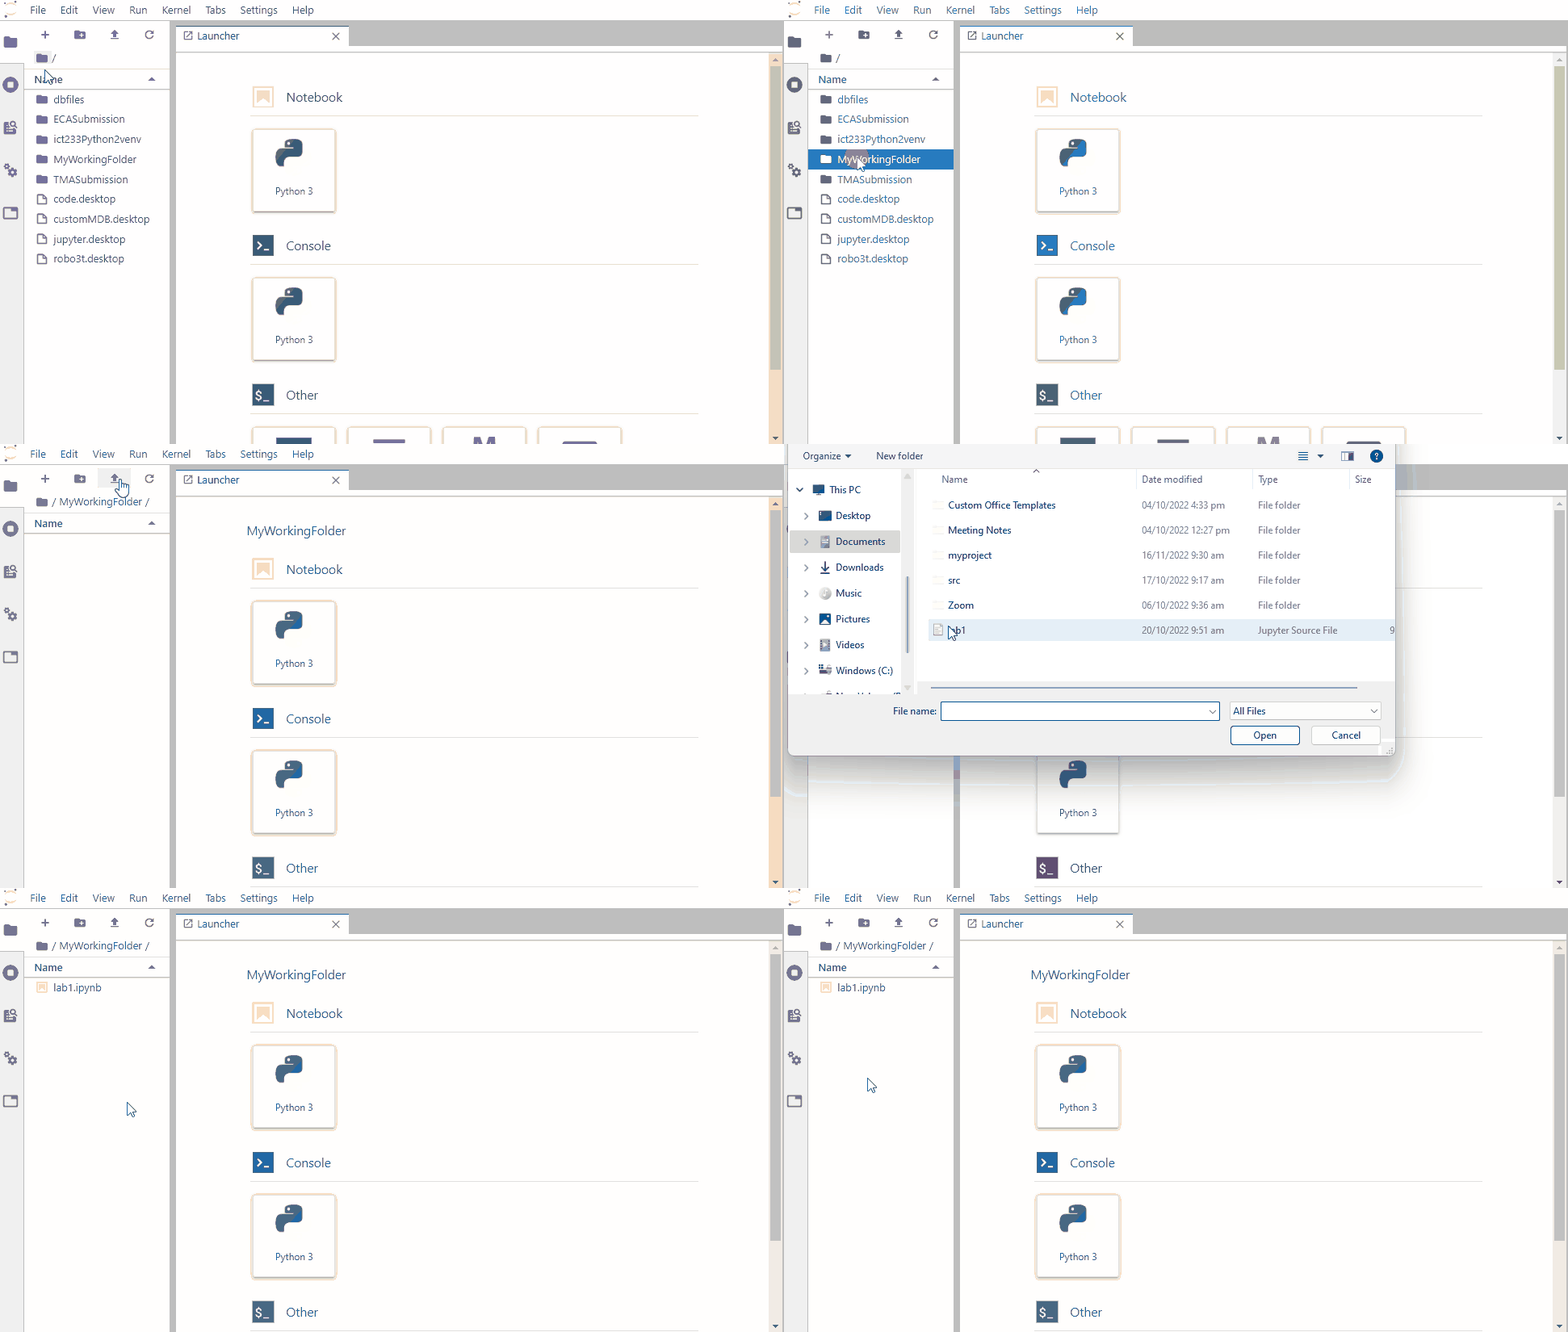
Uploading to Virtual Desktop
-
Navigate to Work Workspace and click on work.
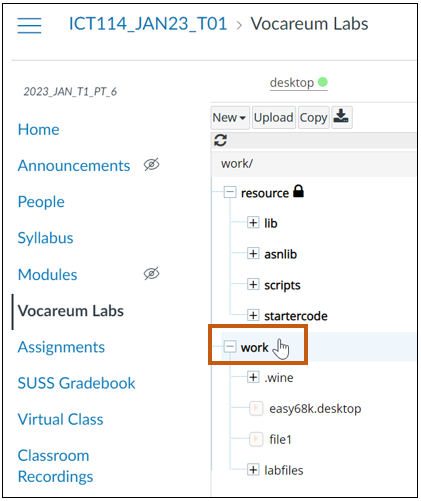
-
Click on Upload button.
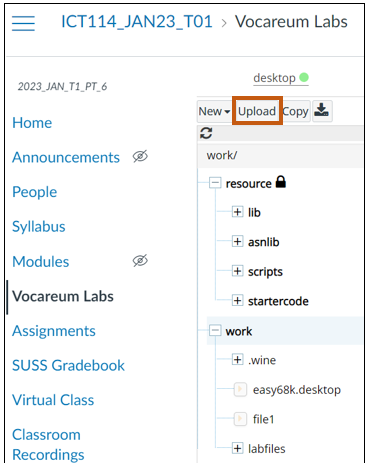
-
To upload multiple files, hold down on the
Controlbutton (for Windows) on the keyboard and select the files one by one. The selected files will be highlighted in blue. Click Open to upload.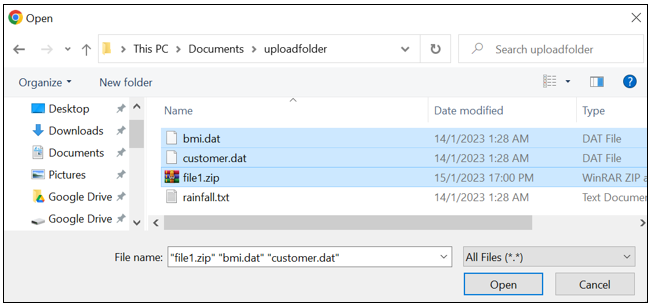
-
System will start to process the upload and will prompt successful when completed.

-
Verify that your files have successfully uploaded from the file tree or in your Virtual Desktop.
